
Customer testimonials are one of the most powerful tools for building trust and converting visitors into customers. In this comprehensive guide, we'll show you exactly how to add stunning testimonial widgets to your Webflow site using VouchView, a powerful testimonial management platform.
Why Testimonials Matter for Your Webflow Site
Before diving into the implementation, let's understand why testimonials are crucial:
Build Trust: 92% of consumers read reviews before making a purchase decision
Increase Conversions: Testimonials can increase conversion rates by up to 34%
Social Proof: They provide authentic validation from real customers
SEO Benefits: Fresh, user-generated content helps with search rankings
What is VouchView?
VouchView is a comprehensive testimonial collection and display platform that makes it incredibly easy to:
Collect testimonials through customizable forms
Import testimonials from Social Media, CSV files and more
Create beautiful, responsive testimonial widgets
Embed widgets anywhere with a simple code snippet
Support both text and video testimonials
Step 1: Setting Up Your VouchView Account
First, you'll need to create a VouchView account and set up your first testimonial campaign:
Visit VouchView.com and sign up for a free account
Create your first testimonial campaign

Customize your collection form with your branding

Start collecting testimonials from your customers

Step 2: Creating Your Testimonial Widget
Once you have testimonials collected, it's time to create a widget for your Webflow site:
Navigate to the "Widgets" section in your VouchView dashboard
Click "Create New Widget"
Choose your widget type and customize the appearance

Step 3: Customizing Your Widget Appearance
VouchView provides extensive customization options to match your Webflow site's design:

Visual Customization
Colors: Background, text, accent, border, and rating star colors
Typography: Font family, size, weight, and line height
Spacing: Compact, normal, or relaxed spacing options
Borders: Rounded corners from none to large radius
Shadows: None, small, medium, large, or brutal (neo-brutalist) shadows
Content Display Options
Element Order: Drag and drop to reorder rating, content, and author sections
Show/Hide Elements: Toggle visibility of ratings, avatars, company names, etc.
Text Alignment: Left, center, or right alignment
Source Attribution: Display where testimonials came from (campaign form, social media, etc.)
Step 4: Getting Your Embed Code
After customizing your widget, VouchView generates a simple embed code:
Click "Get Embed Code" in your widget settings

Copy the provided JavaScript snippet
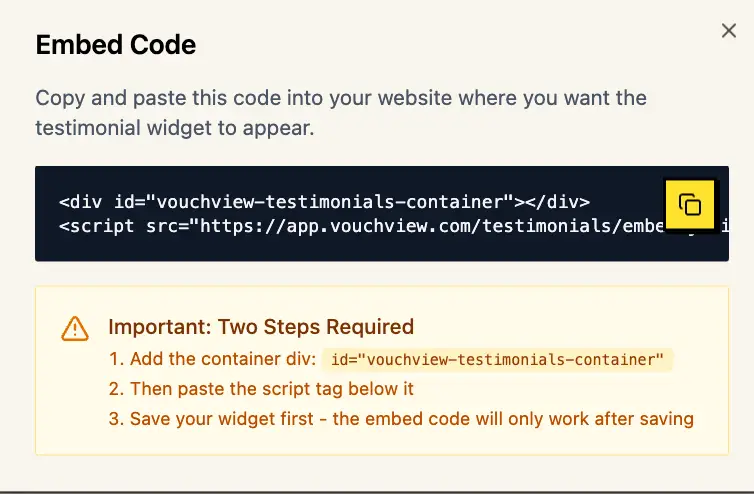
This line of code will load your entire testimonial widget with all customizations applied.
Step 5: Adding the Widget to Your Webflow Site
Now comes the easy part - adding your testimonial widget to Webflow:
Method 1: Using an Embed Element (Recommended)
Open your Webflow project in the Designer
Navigate to the page where you want to add testimonials
Drag an "Embed" element from the Add panel to your desired location
Paste your VouchView embed code into the embed element
Click "Save & Close"
Method 2: Adding to Page Settings (For Global Placement)
If you want testimonials to appear on multiple pages:
Go to Page Settings in Webflow
Scroll to the "Custom Code" section
Add your embed code to the "Before